All Technology’s Available Here

Information Gathering

In this chapter, we will discuss the information gathering tools of Kali Linux. This very impotent in hacking. First we collect the target domain or system information.
NMAP and ZenMAP

NMAP and ZenMAP are useful tools for the scanning phase of Ethical Hacking in Kali Linux. NMAP and ZenMAP are practically the same tool, however NMAP uses command line while ZenMAP has a GUI.
NMAP is a free utility tool for network discovery and security auditing. Many systems and network administrators also find it useful for tasks such as network inventory, managing service upgrade schedules, and monitoring host or service uptime.
NMAP uses raw IP packets in novel ways to determine which hosts are available on the network, what services (application name and version) those hosts are offering, which operating systems (and OS versions) they are running, what type of packet filters/firewalls are in use, etc.
Now, let’s go step by step and learn how to use NMAP and ZenMAP.
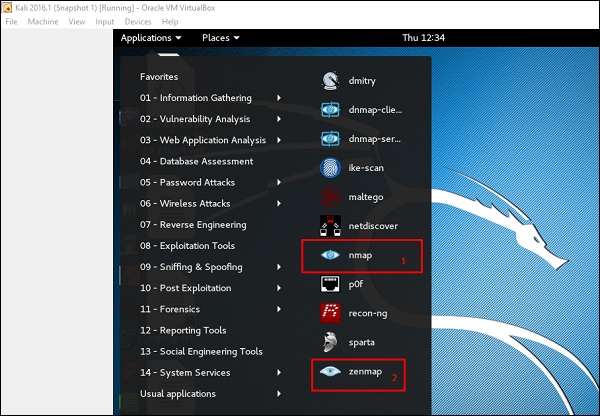
Step 1 − To open, go to Applications → 01-Information Gathering → nmap or zenmap.
Nmap ZenMap
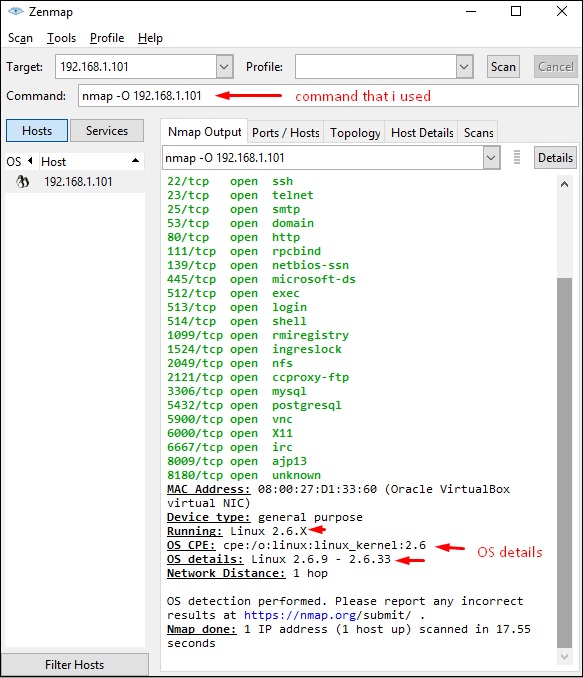
Step 2 − The next step is to detect the OS type/version of the target host. Based on the help indicated by NMAP, the parameter of OS type/version detection is variable “-O”. For more information, use this link: https://nmap.org/book/man-os-detection.html
The command that we will use is −
nmap -O 192.168.1.101
The following screenshot shows where you need to type the above command to see the Nmap output −
Nmap Output
Step 3 − Next, open the TCP and UDP ports. To scan all the TCP ports based on NMAP, use the following command −
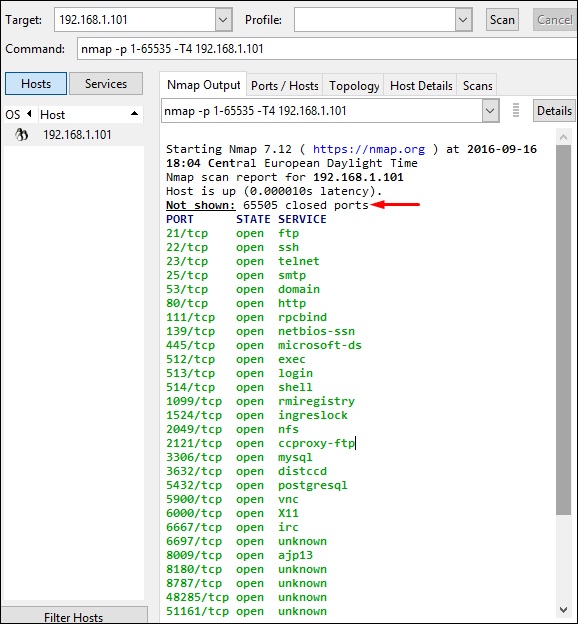
nmap -p 1-65535 -T4  192.168.1.101 
Where the parameter “–p” indicates all the TCP ports that have to be scanned. In this case, we are scanning all the ports and “-T4” is the speed of scanning at which NMAP has to run.
Following are the results. In green are all the TCP open ports and in red are all the closed ports. However, NMAP does not show as the list is too long.
Closed Ports

Stealth Scan

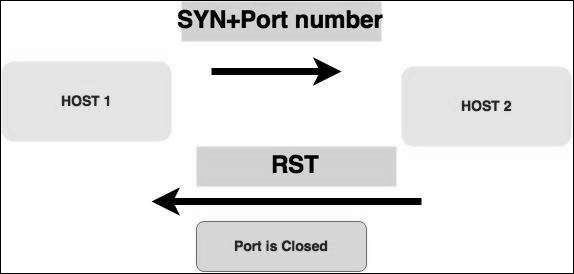
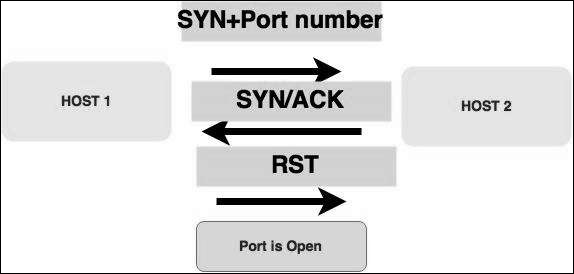
Stealth scan or SYN is also known as half-open scan, as it doesn’t complete the TCP three-way handshake. A hacker sends a SYN packet to the target; if a SYN/ACK frame is received back, then it’s assumed the target would complete the connect and the port is listening. If an RST is received back from the target, then it is assumed the port isn’t active or is closed.
Half Open Scan
Syn Packet
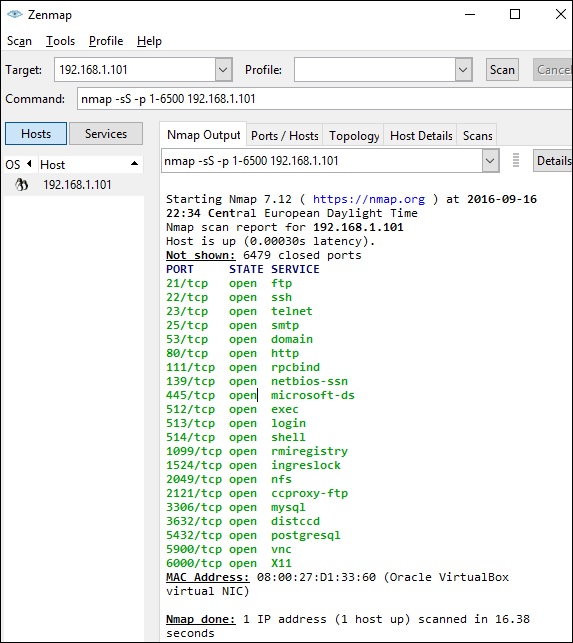
Now to see the SYN scan in practice, use the parameter –sS in NMAP. Following is the full command −
nmap -sS -T4 192.168.1.101 
The following screenshot shows how to use this command −
ZenMap Command

Searchsploit

Searchsploit is a tool that helps Kali Linux users to directly search with the command line from Exploit database archive.
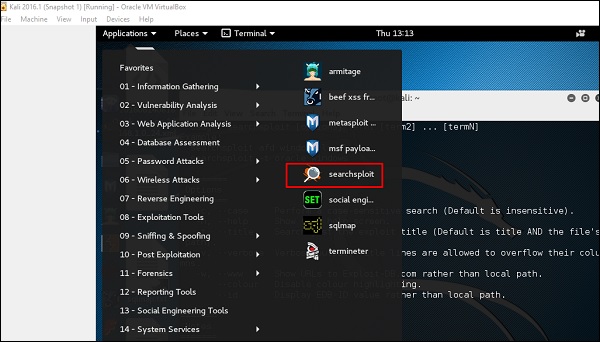
To open it, go to Applications → 08-Exploitation Tools → searchsploit, as shown in the following screenshot.
Searchsploit
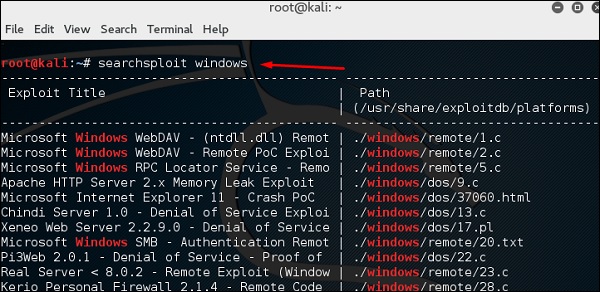
After opening the terminal, type "searchsploit exploit index name".
Exploit Index Name

DNS Tools

n this section, we will learn how to use some DNS tools that Kali has incorporated. Basically, these tools help in zone transfers or domain IP resolving issues.

dnsenum.pl

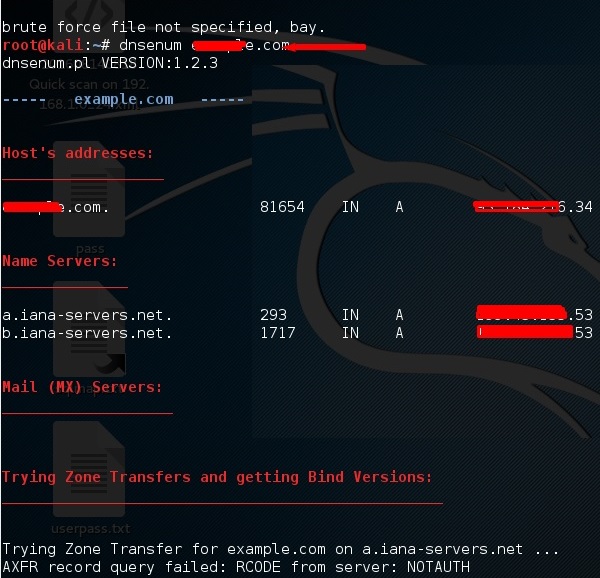
The first tool is dnsenum.pl which is a PERL script that helps to get MX, A, and other records connect to a domain.
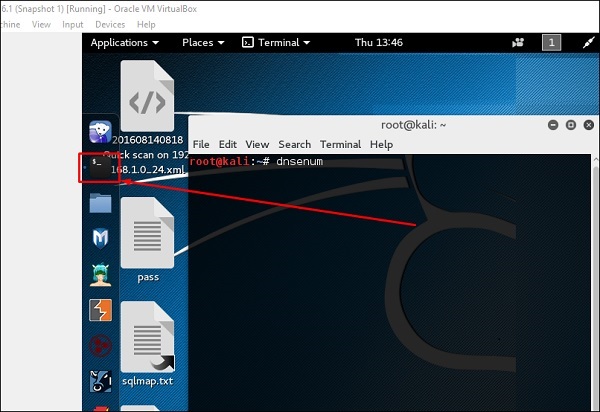
Click the terminal on the left panel.
Terminal Left Panel
Type “dnsenum domain name” and all the records will be shown. In this case, it shows A records.
Domain Name

DNSMAP

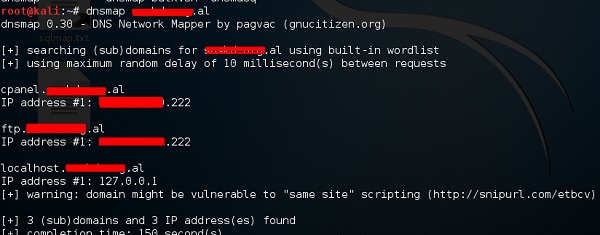
The second tool is DNSMAP which helps to find the phone numbers, contacts, and other subdomain connected to this domain, that we are searching. Following is an example.
Click the terminal as in the upper section , then write “dnsmap domain name”
DNS Map

dnstracer

The third tool is dnstracer, which determines where a given Domain Name Server (DNS) gets its information from for a given hostname.
Click the terminal as in the upper section, then type “dnstracer domain name”.
DnsTracer

LBD Tools

LBD (Load Balancing Detector) tools are very interesting as they detect if a given domain uses DNS and/or HTTP load balancing. It is important because if you have two servers, one or the other may not be updated and you can try to exploit it. Following are the steps to use it −
First, click the terminal on the left panel.
Terminal Left Panel
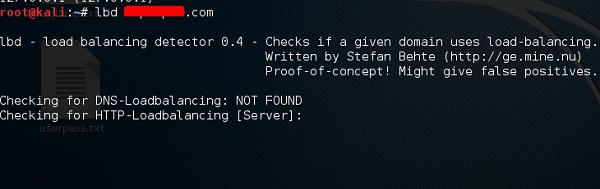
Then, type “lbd domainname”. If it produces a result as “FOUND”, it means that the server has a load balance. In this case, the result is “NOT FOUND”.
LBD Domain Name

Hping3

Hping3 is widely used by ethical hackers. It is nearly similar to ping tools but is more advanced, as it can bypass the firewall filter and use TCP, UDP, ICMP and RAW-IP protocols. It has a traceroute mode and the ability to send files between a covered channel.
Click the terminal on the left panel.
Terminal Left Panel
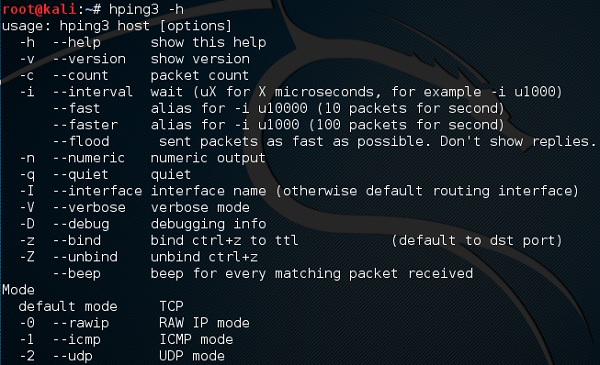
Type “hping3 –h” which will show how to use this command.
Hping3
The other command is “hping3 domain or IP -parameter”
Share:

How to Attack Wifi

In this chapter, we will learn how to use Wi-Fi cracking tools that Kali Linux has incorporated. However, it is important that the wireless card that you has a support monitoring mode.


Fern Wifi Cracker

Fern Wifi cracker is one of the tools that Kali has to crack wireless.
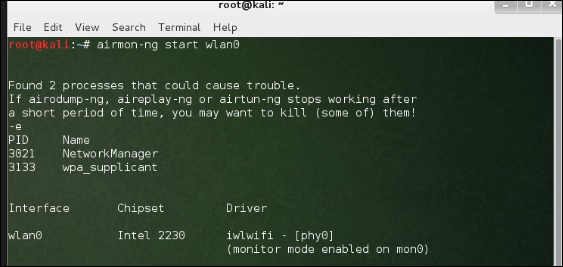
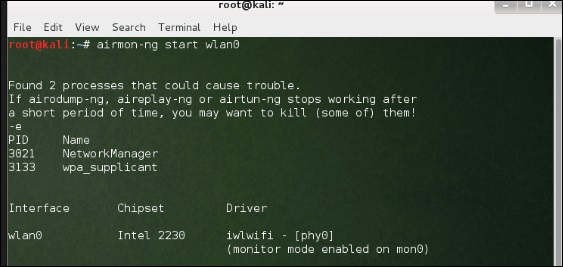
Before opening Fern, we should turn the wireless card into monitoring mode. To do this, Type “airmon-ng start wlan-0” in the terminal.
Airmon Ng
Now, open Fern Wireless Cracker.
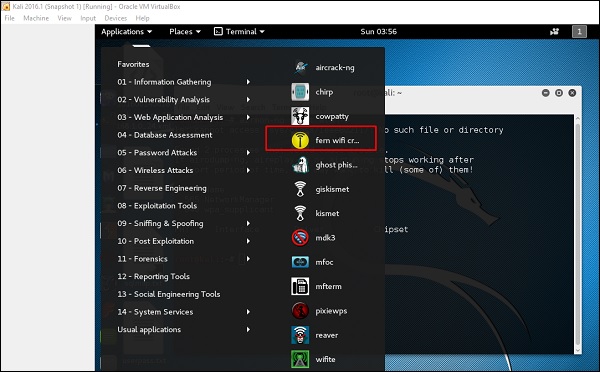
Step 1 − Applications → Click “Wireless Attacks” → “Fern Wireless Cracker”.
Fern Wireless Cracker
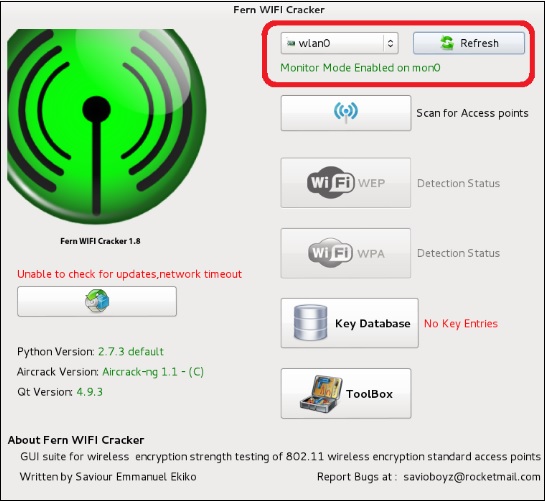
Step 2 − Select the Wireless card as shown in the following screenshot.
Wireless Card
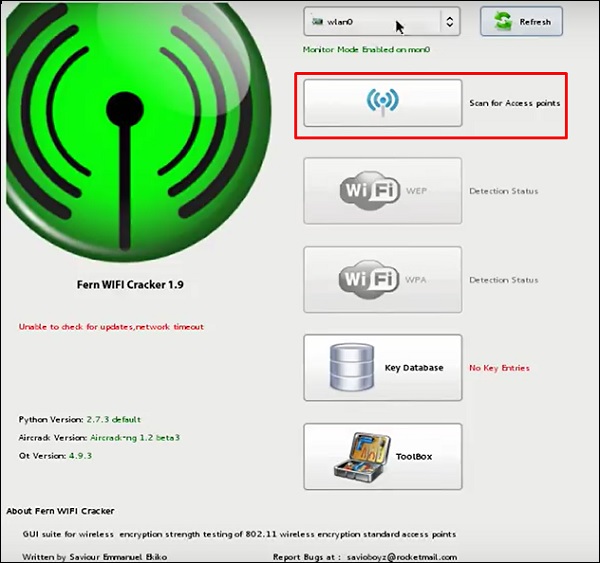
Step 3 − Click “Scan for Access Points”.
Access Point
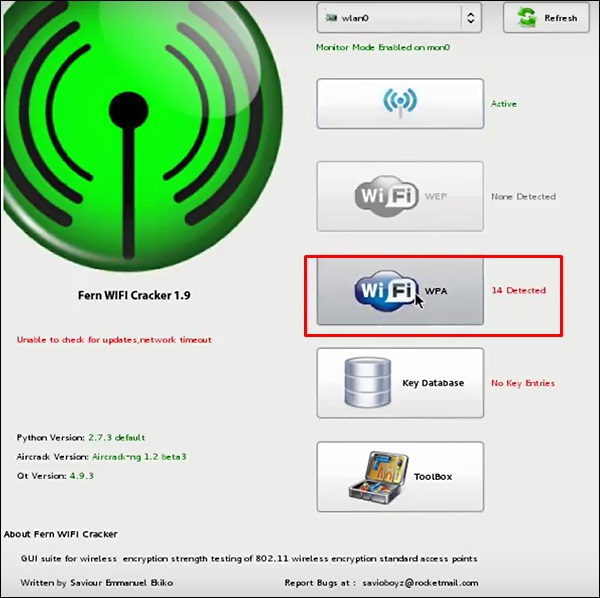
Step 4 − After finishing the scan, it will show all the wireless networks found. In this case, only “WPA networks” was found.
WPA Network
Step 5 − Click WPA networks as shown in the above screenshot. It shows all the wireless found. Generally, in WPA networks, it performs Dictionary attacks as such.
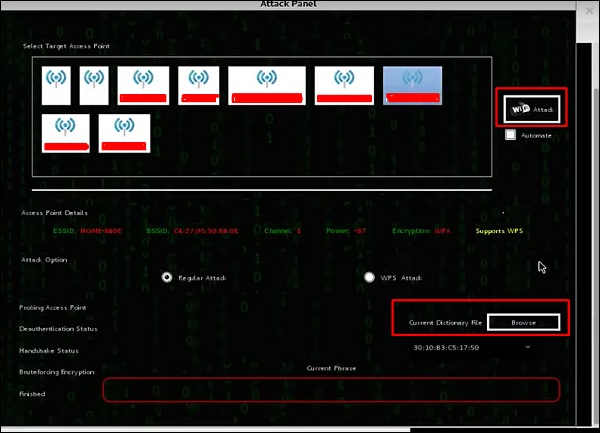
Step 6 − Click “Browse” and find the wordlist to use for attack.
Wordlist
Step 7 − Click “Wifi Attack”.
Wifi Attack
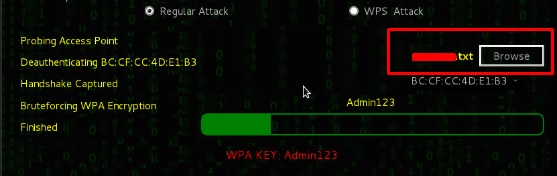
Step 8 − After finishing the dictionary attack, it found the password and it will show as depicted in the following screenshot picture.
Dictionary Attack

Kismet

Kismet is a WIFI network analyzing tool. It is a 802.11 layer-2 wireless network detector, sniffer, and intrusion detection system. It will work with any wireless card that supports raw monitoring (rfmon) mode, and can sniff 802.11a/b/g/n traffic. It identifies the networks by collecting packets and also hidden networks.
To use it, turn the wireless card into monitoring mode and to do this, type “airmon-ng start wlan-0” in the terminal.
Start Wlan
Let’s learn how to use this tool.
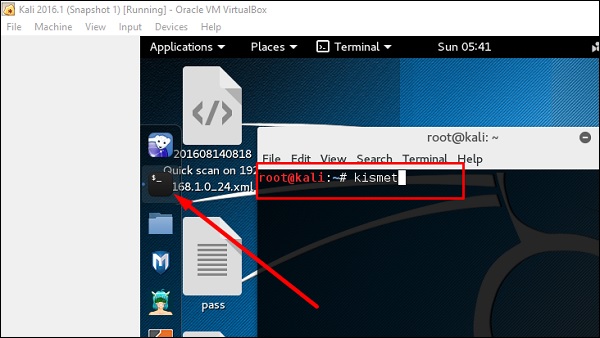
Step 1 − To launch it, open terminal and type “kismet”.
Launch
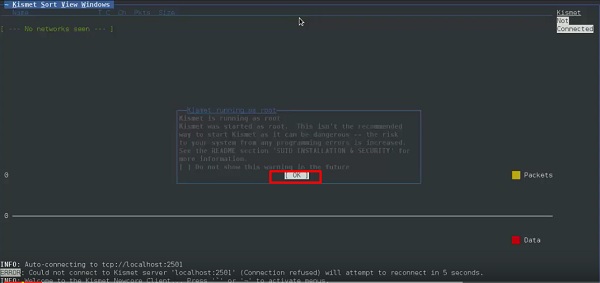
Step 2 − Click “OK”.
Kismet
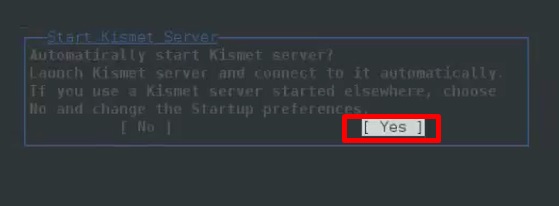
Step 3 − Click “Yes” when it asks to start Kismet Server. Otherwise it will stop functioning.
Start Server
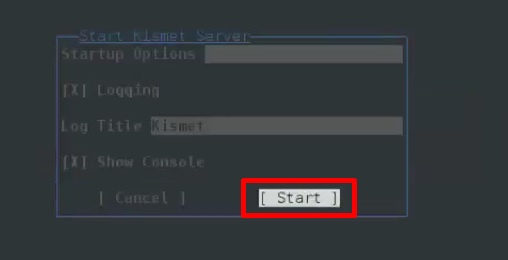
Step 4 − Startup Options, leave as default. Click “Start”.
Leave Default
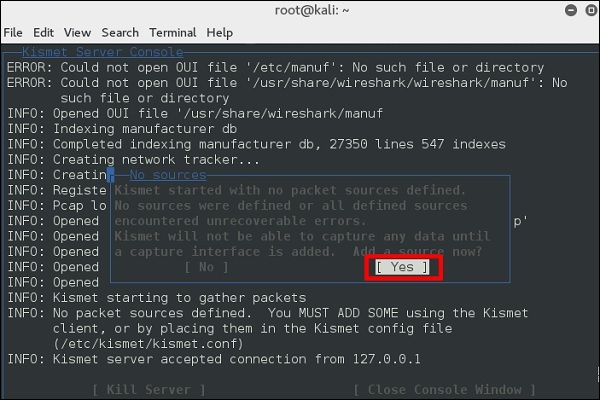
Step 5 − Now it will show a table asking you to define the wireless card. In such case, click Yes.
Define Table
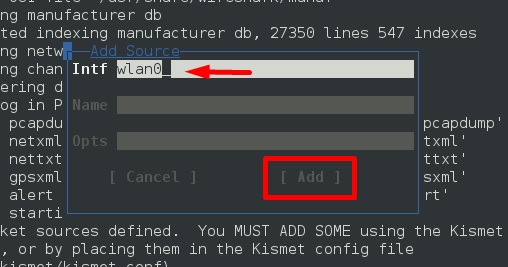
Step 6 − In this case, the wireless source is “wlan0”. It will have to be written in the section “Intf” → click “Add”.
Wirless Source
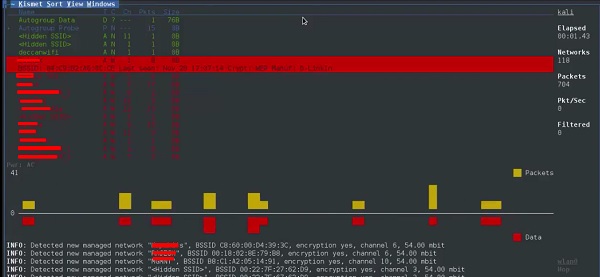
Step 7 − It will start sniffing the wifi networks as shown in the following screenshot.
Networks
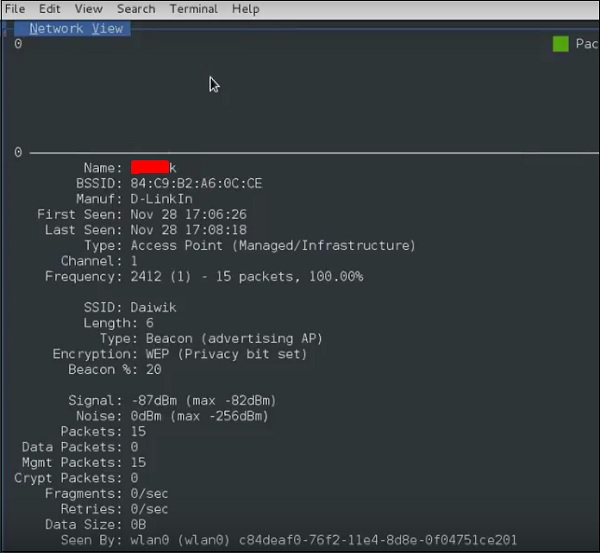
Step 8 − Click on any network, it produces the wireless details as shown in the following screenshot.
Wireless Network

GISKismet

GISKismet is a wireless visualization tool to represent data gathered using Kismet in a practical way. GISKismet stores the information in a database so we can query data and generate graphs using SQL. GISKismet currently uses SQLite for the database and GoogleEarth / KML files for graphing.
Let’s learn how to use this tool.
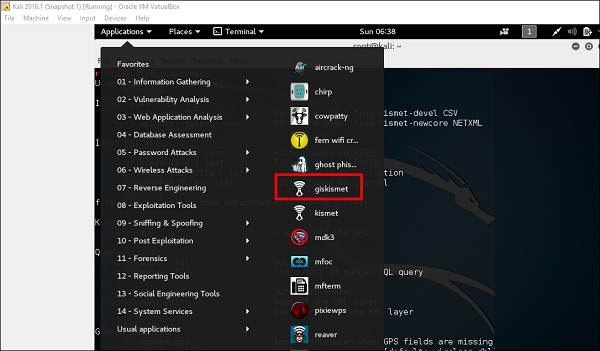
Step 1 − To open GISKismet, go to: Applications → Click “Wireless Attacks” → giskismet.
Giskismet
As you remember in the previous section, we used Kismet tool to explore data about wireless networks and all this data Kismet packs in netXML files.
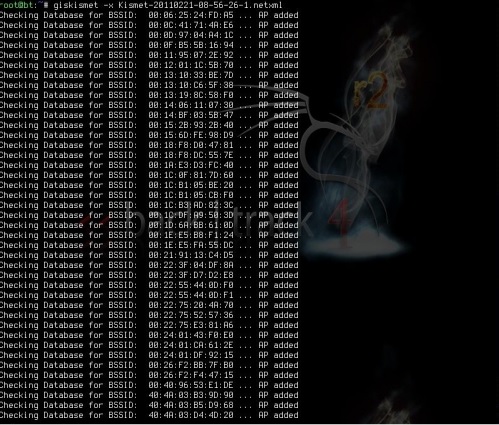
Step 2 − To import this file into Giskismet, type “root@kali:~# giskismet -x Kismetfilename.netxml” and it will start importing the files.
Importing Files
Once imported, we can import them to Google Earth the Hotspots that we found before.
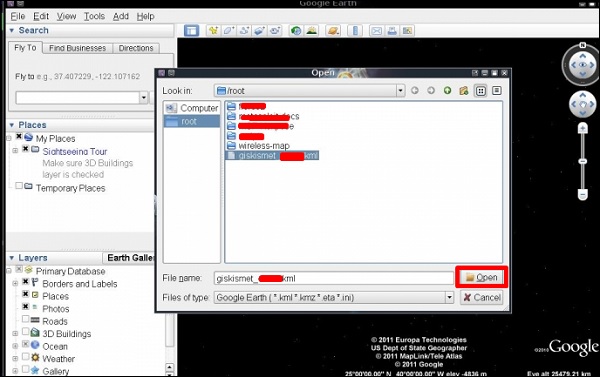
Step 3 − Assuming that we have already installed Google Earth, we click File → Open File that Giskismet created → Click “Open”.
Google Earth
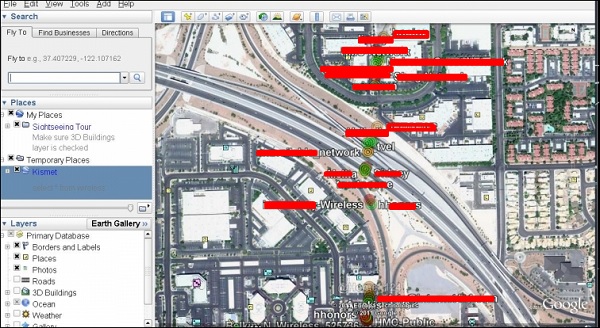
The following map will be displayed.
Map

Ghost Phisher

Ghost Phisher is a popular tool that helps to create fake wireless access points and then later to create Man-in-The-Middle-Attack.
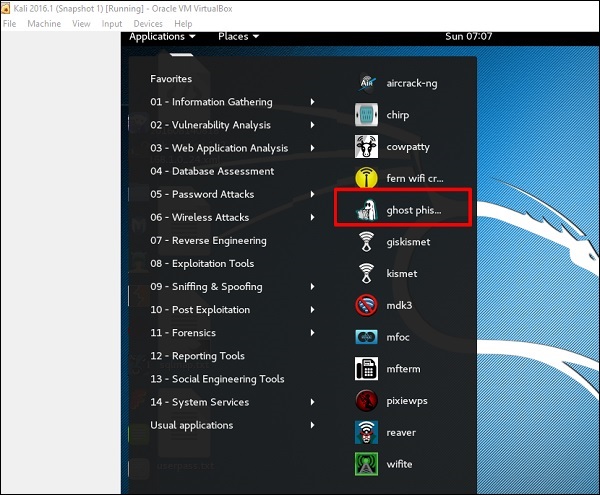
Step 1 − To open it, click Applications → Wireless Attacks → “ghost phishing”.
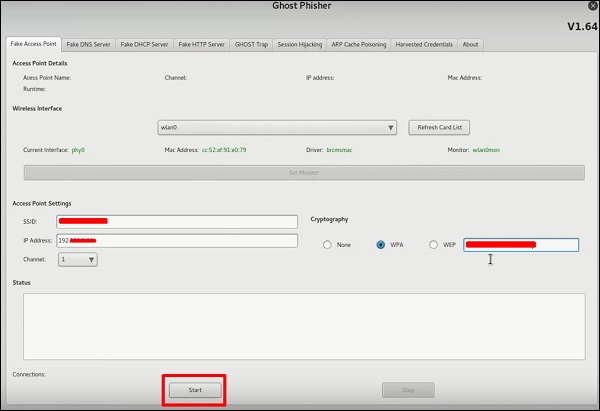
Ghost Phisher
Step 2 − After opening it, we will set up the fake AP using the following details.
  • Wireless Interface Input: wlan0
  • SSID: wireless AP name
  • IP address: IP that the AP will have
  • WAP: Password that will have this SSID to connect
Opening Ghost Phisher
Step 3 − Click the Start button.

Wifite

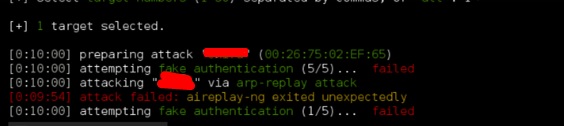
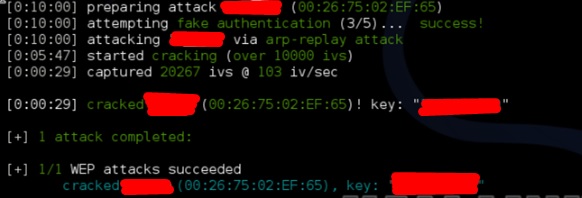
It is another wireless clacking tool, which attacks multiple WEP, WPA, and WPS encrypted networks in a row.
Firstly, the wireless card has to be in the monitoring mode.
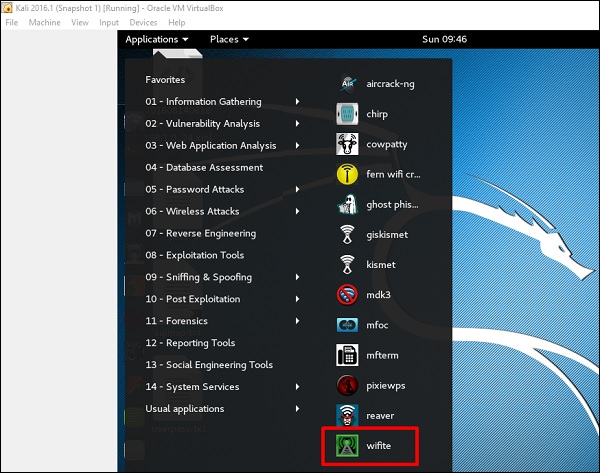
Step 1 − To open it, go to Applications → Wireless Attack → Wifite.
Wifite
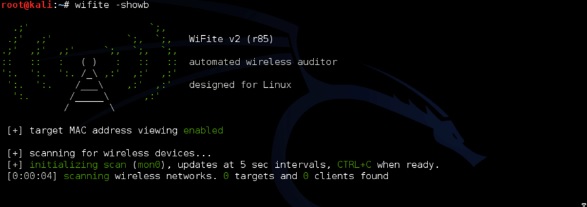
Step 2 − Type "wifite –showb"to scan for the networks.
Wifite Showb
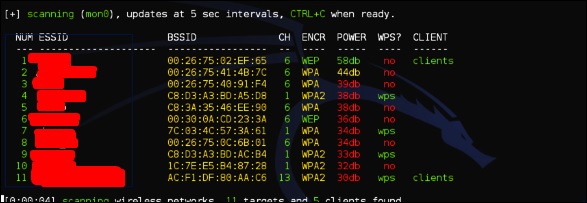
Scan Network
Step 3 − To start attacking the wireless networks, click Ctrl + C.
Attacking
Step 4 − Type “1” to crack the first wireless.
Crack First
Step 5 − After attacking is complete, the key will be found.
Key Found

Share:

மீண்டும் கணினிகளை தாக்கத் தொடங்கிய ரேன்சம்வேர் வைரஸ் : கம்ப்யூட்டரை காக்க இதோ வழி?

சரக்குகளை உலகம் முழுவதும் விநியோகம் செய்ய, கண்டெய்னர் சேவையில் ஈடுபட்டுள்ள மேர்ஸ்க் நிறுவனம் ரேன்சம்வேர் வைரஸ் தாக்குதலால் கடுமையாக பாதிக்கப்பட்டுள்ளது.

உலகில் நடக்கும் கப்பல் கண்டெய்னர் சேவையில் 7ல் ஒரு கண்டெய்னர் தன் வசம் வைத்துள்ள மிகப்பெரிய நிறுவனம் ஏ.பி.முல்லர் - மேர்ஸ்க். இந்நிறுவனத்தின் சர்வரை ரேன்சம்வேர் வைரஸ் தாக்கியுள்ளதாக, நிறுவனத்தின் ஐ.டி அதிகாரிகள் தெரிவித்துள்ளதாக டுவிட்டரில் பதிவிடப்பட்டுள்ளது.


We confirm some Maersk IT systems are down. The safety of our customers' business and our people is our top priority. Updates to follow.
— Maersk Line (@MaerskLine) June 27, 2017

இதன் காரணமாக உலகளவில் நடைப்பெறும் எங்கள் கப்பல் கண்டெய்னர் சேவை முற்றிலும் பாதிக்கப்பட்டுள்ளது.

இதனால் தற்போது பயணத்தில் உள்ள 600 கண்டெய்னர்களின் நிலை என்ன என்பது தெரியவில்லை. வைரஸ் தாக்குதல் காரணமாக நிறுவனத்தின் தகவல்களை அறிவதில் மொத்தமாக சிக்கல் ஏற்பட்டுள்ளது,விரைவில் இந்த பிரச்னையை தீர்க்கப்பட்டும் என தெரிவிக்கப்பட்டுள்ளது.

தீர்வு என்ன?
Share:

எதிர்பார்ப்புகளை மிஞ்சும் வசதிகளுடன் இன்ஃபோகஸ் டர்போ 5!

இன்ஃபோகஸ் நிறுவனத்தின் புதிய ஸ்மார்ட்போன் எல்லாவிதமான எதிர்பார்ப்புகளையும் மிஞ்சும் வசதிகளுடன் மிகக் குறைந்த விலையில் அறிமுகமாகியுள்ளது.

அமெரிக்காவைச் சேரந்த மொபைல் தயாரிப்பு நிறுவனம் இன்ஃபோகஸ் இந்தியாவில் மார்க்கெட்டை பிடிக்க முயற்சி மேற்கொண்டு வருகிறது. மேக் இன் இந்தியா திட்டத்தில் இணைந்து இந்தியாவிலேயே மொபைல் போன்களைத் தயாரித்து விற்க அந்த நிறுவனம் முடிவுசெய்துள்ளது.


இன்ஃபோகஸ் நிறுவனத்தின் புதிய ஸ்மார்ட்போன் எல்லாவிதமான எதிர்பார்ப்புகளையும் மிஞ்சும் வசதிகளுடன் மிகக் குறைந்த விலையில் அறிமுகமாகியுள்ளது.

அமெரிக்காவைச் சேரந்த மொபைல் தயாரிப்பு நிறுவனம் இன்ஃபோகஸ் இந்தியாவில் மார்க்கெட்டை பிடிக்க முயற்சி மேற்கொண்டு வருகிறது. மேக் இன் இந்தியா திட்டத்தில் இணைந்து இந்தியாவிலேயே மொபைல் போன்களைத் தயாரித்து விற்க அந்த நிறுவனம் முடிவுசெய்துள்ளது.


ஆண்ட்ராய்ட் இயங்குதளத்தின் சமீபத்திய வெர்ஷன் ஆண்ட்ராய்ட் 7 நோகட் மூலம் இயங்குவதால் மல்டி டேப் உள்ளிட்ட பல பிரத்யேக வசதிகள் இருக்கும். க்வாட் கோர் மீடியாடெக் எம்.டி.6737 ப்ராசெஸர் கொண்டது.

5.2 இன்ச் ஹெச்.டி. தொடுதிரை, 13MP பின்புற கேமரா, 5MP செல்ஃபி கேமரா, ஜியோ சிம்கார்ட் பயன்படுத்த தேவையான VoLTE, 32GB மெமரிகார்ட் வசதி ஆகிய பல சிறப்பு அம்சங்கள் உள்ளன.

7 ஆயிரம் ரூபாய்க்குள் மார்க்கெட்டில் உள்ள வேறு எந்த மொபைலும் 5000mAh திறன் கொண்ட பேட்டரி இல்லை. மற்ற நிறுவனங்களின் விலை அதிகமான ப்ரீமியம் ஸ்மார்ட்போன்களில் கூட இவ்வளவு திறன் கொண்ட பேட்டரி கிடையாது.

இந்த பேட்டரியின் மிக முக்கியமான வசதி ரிவர்ஸ் சார்ஜிங் அம்சம்தான். இரண்டு நாள் வரை நீடிக்கக்கூடிய பேட்டரி என்பதால், இதை பவர் பேங்க் போல பயன்படுத்தி மற்ற மொபைல், டேப்லெட் போன்ற கேஜெட்களையும் சார்ஜ் செய்யலாம்! இந்த வசதி Asus Zenfone Max போன்ற வெகுசில மொபைல்களில் மட்டுமே உள்ளது.

எனவே, இன்ஃபோகஸ் டர்போ 5 மொபைலின் இரண்டு வேரியண்ட்களும் பட்ஜெட் மற்றும் ப்ரீமியம் மொபைல் வாடிக்கையாளர்களுக்கு இந்த மொபைல் நிச்சயம் நல்ல சாய்ஸ் ஆக இருக்கும்.
Share:

நம் மூளையிலிருந்து பாஸ்வேடு திருடும் ஹேக்கர்கள்!

உலகம் முழுவதும் கம்ப்யூட்டர் வைரஸ் தாக்குதல்கள் அதிகரித்து வரும் சூழலில் ஹேக்கர்களால் நம் மூளையிலிருந்து நமக்குத் தெரியாமல் பாஸ்வேடு முதலிய விவரங்களைத் திருட முடியும் என்ற அதிர்ச்சிகரத் தகவல் ஆய்வு ஒன்றில் தெரியவந்துள்ளது.

Wannacry, Petya போன்ற பணம் பறிக்கும் ரேன்சம்வேர் வைரஸ் மென் பொருட்கள் உலகம் முழுவதும் பல நாடுகளில் லட்சக்கணக்கான கம்ப்யூட்டர்களை முடக்கியுள்ளது.


இச்சூழலில் மேலும் அச்சுறுத்தும் விதமாக ஹேக்கர்களால் நம் மூளையிலிருந்து நமக்குத் தெரியாமல் பாஸ்வேடு முதலிய விவரங்களைத் திருட முடியும் என்று ஆய்வு ஒன்றில் தெரியவந்திருக்கிறது.

அமெரிக்காவின் பிர்மிங்ஹாமில் உள்ள அலபாமா பல்கலைக்கழகத்தைச் சேர்ந்த ஆய்வாளர்கள் நடத்திய ஆய்வின் முடிவில் இதனைத் தெரிவித்துள்ளனர். ரோபாடிக் விளையாட்டு பொம்மைகள் மற்றும் வீடியோ கேம்களை மூளையால் கட்டுப்படுத்தும் விதமாக உருவாக்கப்படும் எலெக்ட்ரோஎன்செஃபலோகிராப் (இ.இ.ஜி.) ஹெட்செட் மூலம் இது சாத்தியம் என்று அவர்கள் தெரிவிக்கின்றனர்.

இ.இ.ஜி. ஹெட்செட் அணிந்தபடி வீடியோ கேம் விளையாடிக்கொண்டிருக்கும் ஒருவர் அந்த ஹெட்செட்டை அணிந்தபடியே வங்கி இணையதளத்தில் லாக்-இன் (Log in) செய்தால், சில வைரஸ் மென்பொருட்களின் உதவியுடன் அவரது மூளையில் இருந்து பாஸ்வேடு போன்ற முக்கிய தகவல்களை திருட முடியும்.
Share:

3 கண்டங்களை இணைக்கும் உலகின் மிகப்பெரிய கடல்வழி இணையக் கேபிள்; ஜியோவின் பிரம்மாண்டம்...!

டெல்லி: 3 கண்டங்களை இணைக்கும் வகையில், உலகின் மிகப்பெரிய கடல்வழி இணையச் சேவையை ஜியோ அறிமுகம் செய்ய உள்ளது.

கடந்தாண்டு அதிரடி சலுகைகளுடன் ஜியோ தொலைத் தொடர்பு சேவை அறிமுகம் செய்யப்பட்டது. இது இந்தியாவில் மிகப்பெரிய புரட்சியை ஏற்படுத்தியது. இந்நிலையில் இணையச் சேவைக்காக கடல்வழி கேபிள்களை நிர்மாணிக்க முடிவு செய்துள்ளது. இதன் மூலம் 40 டெரா பிட்ஸ் அலைவரிசையை பகிர முடியும். இந்த சேவை ஆசியா, ஆப்ரிக்கா, ஐரோப்பியா ஆகிய 3 கண்டங்களை இணைக்கிறது. அதற்காக ஏஏஇ-1 என்ற கேபிள் பயன்படுத்தப்பட்டு வருகிறது. இந்த அதிவேக சேவையைக் கொண்டு, அனைத்துவிதமான தகவல் தொடர்பு, பயன்பாடுகளைப் பெறலாம்.

இந்த கேபிள்கள் பிரான்சின் மர்செய்லீயில் இருந்து, ஹாங்காங் வரை நீள்கிறது. இதற்காக ஐரோப்பா, மத்திய கிழக்கு நாடுகள், ஆசியாவில் உள்ள தொலைத் தொடர்பு நிறுவனங்களுடன் ஜியோ பேச்சுவார்த்தை நடத்தி வருகிறது. இந்த கேபிள் மூலம் 100 ஜிபிபிஎஸ் அதிவேக இணையச் சேவையை தொடர்ந்து பெறலாம் என்று தெரிவிக்கப்பட்டுள்ளது. இந்த இணையச் சேவை மூலம், இந்தியாவின் இணைய வீடியோ சேவையின் தேவை பூர்த்தி செய்யப்படும் என்று கூறப்பட்டுள்ளது.

Reliance Unveils The World's Longest 100GPBS Underwater Cable That Stretches Over Three Continents.

Share:

Dedicated to all IT EMPLOYEES


Share:

ஜாவாவை வீழ்த்தும் ரூபி மொழியை கற்கும் எளிய வழி.​


ruby-847c4d5e8e43981d3690e77fe389124d நீங்கள் ரூபி கற்றுக் கொள்ள வேண்டுமா? இதோ உங்களுக்காக ஹக்கெட்டி ஹேக் (Hackety Hack).
ஹக்கெட்டி ஹேக் (Hackety Hack) என்பது ஒரு திறந்த மூல (Open Source) பயன்பாடு. இது மாணவர்களுக்கு அடிப்படை நிரலாக்க மொழியை(Programming Language) புரிந்து கொள்ள உதவும். இதனை கொண்டு ரூபி நிரலாக்க மொழியை எளிதாக கற்று கொள்ளவும், கற்பிக்கவும் முடியும். இதற்கு எந்த அடிப்படை மொழியும் தேவை இல்லை. ஹக்கெட்டி அனைத்து இயங்கு தளத்திலும் (மாக்,விண்டோஸ் மற்றும் லினக்ஸ்) இயங்கும் வண்ணம் உருவாக்கப்பட்ட ஒரு ஊடாடும் பயிற்சியை(Interactive Training) வழங்குகிறது. இது ஸ்க்ராட்ச்(Scartch) மற்றும் அலிஸ்(Alice) போன்ற வரைகலை(Graphical Interface) நிரலாக்க மொழிகளுடன் தொகுதிகள்(blocks) முலமும் கற்று கொள்ள இயலும். இது ஷோஸ் (Shoes) toolkitயை கொண்டு எளிதாகவும், விளையாட்டாகவும் வரைகலை முகப்பை வரைய உதவுகின்றது.
ஹக்கெட்டி ஹேக் சாளரம்
splash
இதனை கொண்டு மாணவர்கள் விரைவாகவும், எளிதாகவும் தங்கள் சொந்த பயன்பாடுகளையும் (Applications), வலைதளங்களை (Websites) உருவாக்க முடியும். மாணவர்கள் நிரலாக்க மொழியில் ஒரு வலுவான அடித்தளத்தை கொடுக்கிறது ஹேக்.
மேலும் விபரங்களுக்கு
சி. சிந்துஜா சுந்தராஜ்,
ஆசிரியர்,
கட்டற்ற மென்பொருள் வன்பொருள் இயக்கம்
புதுச்சேரி
Share:

FREENAS சர்வர் உருவாக்குவது எப்படி


freenas-logo_no_bgnd200-e547889e7857020d
                                                     
உங்கள் பழைய கம்ப்யூட்டர்ஐ HOMEFILE SERVERஆக மாற்றுங்கள்:
நாம் பயன்படுத்தும் பொருட்களில் எது பழசாகுதோ இல்லையோ, கைபேசியும் , கணினியும்பழசாகிவிடும், புதுப் புது வசதிகளும் கண்டுபிடிப்பும் தாங்க ​ இதுக்கு ​ ​காரணம்!!
LAPTOP , NOTEBOOK , ULTRABOOK ன்னு ​சந்தைல  புது ​தொழில்நுட்பம்வருகையால பல வீடுகளில் DESKTOP PC பயனற்ற பொருளாக​க்  கிடக்கிறது.
அப்படி ஒரு DESKTOP PC உங்க வீட்ல ​இருந்தாகவலை​ய விடுங்க, FREENAS என்ற புது OPERATING SYSTEM உங்க கம்ப்யூட்டர் ஐ ஒரு கணினி கட்டமைப்பு சார்த்த சேமிப்பு கருவியாக மாற்றிவிடும்.
உங்க வீட்டுல இரண்டு , மூன்று கணினிகளோ அல்லது மடிக்கணினிகளோ இருந்தால் இந்த FREENAS File Server மிகுந்த பயன்மிக்கதாக இருக்கும்.

  • பொதுவான Firewall
  • பொதுவான BitTorrent Downloader
  • அனைத்து புகைப்படங்கள் , வீடியோக்கள் சேமித்து வைத்தல்
  • MP3 பாடல்களை இங்கு மட்டும் வைத்து அனைவரும் கேட்டுக்கொள்ளும் வசதி
  • போன்றவை FREENASஇன்  குறிப்பிடத்தகுந்த பயன்பாடுகள் ஆகும்.

NAS உபயோகிக்க உங்கள் PCல் இருக்கவேண்டியவை:
என்ன தான் பழைய கம்ப்யூட்டரில் இயங்கும் என்றாலும் சற்று தற்காலத்திய கம்ப்யூட்டரில் இதன் சேவை முழுமையாக பெற முடியும்.FREENAS, FREEBSDஐ சார்ந்தது, ஆதலால் FREEBSDஆதரிக்கும் எல்லா HARDWAREலிலும் இது இயங்கும்.
32 BIT மற்றும் 64 BIT CPU ல் இயங்கும் இந்த FREENAS , ஆனால் 64 BIT CPU மிகவும் பொருத்தமானது, ZFS FILE SYSTEM உடன் இயங்க குறைந்தபட்சம் 8 GB RAM தேவைபடுகிறது, உங்களிடம் குறைவான RAM வசதிஅதாவது 2GB RAM இருந்தால் நீங்கள் UFS FILE SYSTEM பயன்படுத்தலாம்….
FREENASஐ CD அல்லது USB ல் நிறுவு செய்வதன் மூலம் COMPUTERன் STORAGE​ஐ ​மிச்ச​ப் படுத்திகொள்ளலாம்.
FREENAS ஐ இங்கு DOWNLOAD செய்யுங்கள்.
http://web.freenas.org/download-freenas-release.html , அதை CD அல்லது USB ல் COPY செய்து உங்கள் COMPUTER ல் BOOT செய்யுங்கள்.
FREENAS INSTALL செய்யும் முறை:
freenas1
உங்கள் COMPUTERல் FREENAS INSTALLERஐ BOOT செய்து பின்வரும் வழிமுறைகளை ஒன்றின் ஒன்று செய்துவாருங்கள்,
  • USB அல்லது CD ஐ உங்கள் COMPUTERல் சொருகுங்கள்,
  • INSTALLATION திறையில் INSTALL/UPGRADE என்று தேர்வுசெய்து, எந்த DRIVEல் சேமிக்க வேண்டும் என தேர்ந்தெடுங்கள்.
நீங்கள் தேர்வு செய்த DRIVE ல் FREENAS OPERATING SYSTEM சேமிக்கப்படும், INSTALLATION நிறைவடைந்தது, உங்கள் CD மற்றும் USBகு இனி வேலை இல்லை.. அவற்றை நீக்கிவிட்டு உங்கள் COMPUTER ஐ மறு தொடக்கம் செய்யுங்கள்.
freenas2
FREENAS நிறுவுதல்:
COMPUTER மறுதொடக்கம் ஆனவுLடன் கட்டுபாட்டு முனையம் திரை ​

​திறக்கும் ​, நீங்கள் இதிலிருந்தும் SETTINGS தேர்வுசெய்யலாம், அல்லது திரையின் அடியில் இருக்கும் URL ல் மற்ற COMPUTER ன் WEB BROWSER ல் இணைந்து FREENAS GRAPHICAL WEB INTERFACE ஐ பயன் படுத்தலாம்.
(இப்பொழுது நீங்கள் MONITOR உடன் இருக்கும் இணைப்பை துண்டித்து விடலாம்)
freenas3
WEB INTERFACEல் பதிவி செய்ய தேவையான PASSWORDஐ FREENAS உடனடியாகத்​தேர்வு  செய்ய​ச்சொல்லும்,நினைவில் நன்கு பதித்து வைத்து கொள்ளும்படியான ​
​கடவுச்சொல்லை தேர்வு செய்யுங்கள்.
freenas4
இப்பொழுது நீங்கள் FREENAS சேவையைத்​தொடங்கும் WEB INTERFACE பார்க்கலாம்,
இது தனிப்பயன் NAS கருவியில் இருப்பது போன்றேயாகும்.
freenas5
அடிப்படை NAS அமைப்பு:
முதலில் நீங்கள் STORAGEஐ அமைக்கவேண்டும், TOOLBAR ல் உள்ள STORAGE ICONஐ கிளிக் செய்தால் STORAGE PANE திரை திறக்கும்,ZFS VOLUME MANAGER பயன்படுத்தி ZFS பிரிக்கலாம் அல்லது UFS VOLUME MANAGER பயன் படுத்தி UFS பிரித்து​ ​க்
கொள்ளுங்கள்
.freenas6
SHARING PANE மூலம் தங்கள் புது தேக்கத்தை உங்கள் வலையமைப்பில் உள்ள மற்ற COMPUTERயுடன் பகிர்ந்து கொள்ளலாம், பலதரப்பான OS பலதரப்பான வரைமுறைகளை ஆதரிக்கும்,
FREENAS உங்களை WINDOWS (CIFS), UNIX/LINUX(NFS) அல்லது APPLE (AFP) பரிமாற்றங்களுக்கு ​ஒத்துழைக்கிறது.
நீங்கள் என்ன PROTOCOL பயன்படுத்தினாலும் ​இந்த தகவல் பரிமாற்றம், பிற தகவல் பரிமாற்றம் போன்றதே.
உதாரணமாக நீங்கள் CIFS SHARE செய்யும் பொழுது தானாக WINDOWS EXPLORER அல்லது FILE EXPLORER வலையமைப்பில் தோன்றிவிடும்.

மேலும் சில ​​சிறப்பம்சங்கள் :
FREENAS பல சேவைகளை வழங்குகிறது , INTERGRATED USER TOOLS மூலம் யார்யாருக்கு எந்தfreenas7 தகவல் ​​பகிரலாம் , அல்லது அனைவரும் பயன்படுத்தும் வகையில் அமைத்துக்கொள்ளலாம் FTP,RSYNC,SSH,DYNAMIC DNS போன்ற சேவைகளும் அவற்றில் சில…
PLUGIN SCREEN மிகவும் சுவாரசியமாக உள்ளது , பல மூன்றாந்தரப்பு தொகுப்புகள் இதில் அடங்கும் , நீங்கள் TRANSMISSION BIT TORRENT CLIENT அல்லது PLEX MEDIA SEVER ஐ இங்கு INSTALL செய்து உங்கள் பழைய PCஐ ஒரு BIT TORRENT DOWNLOADER , NETWORK MEDIA SERVER மேலும் NAS ஆக பயன்படுத்தலாம்.

freenas8உங்கள் பழைய COMPUTER ஐ மறுபடியும் உபயோகிக்க FREENAS சிறந்த வழியாகும்.
 
Share:

பள்ளிக் குழந்தைகளுக்கான 5 திறந்த மூல மென்பொருள்கள்


3 டக்ஸ் பெயிண்ட் என்பது 3 முதல் 12 வயதுக்கு உட்பட்ட குழந்தைகள் படம் வரைவதற்காக உதவும்.1
ஸ்க்ராட்ச் என்பது நிகழ்வு சார்ந்த நிரலாக்க (Event driven programming) மொழி. இம்மொழியை கொண்டு அசைவூட்டும் படங்கள், செயல்பாடுகள், கதைகள், விளையாட்டுக்கள் போன்றவற்றை உருவாக்கி மாற்றவர்களுடன் பகிர்ந்துகொள்ள இயலும்.
2
இசுட்டெல்லேரியம் (Stellarium) என்பது வானிலுள்ள கோள்களின் உருவ அமைப்பை காண உதவும்.
3
கால்சியம் (Kalzium) என்பது கட்டற்ற ஆவர்த்தன (Periodical table) அட்டவணை
மென்பொருள். இது தனிமங்களை பற்றிய விவரங்கள் அறிந்து கொள்ள உதவும் தொழில்நுட்பம்.
4
கிம்ப் (GIMP அல்லது GNU Image Manipulation Program) என்பது ‘அடோப் ஃபோட்டோஷாப்’ மென்பொருளுக்கு நிகராக உருவாக்கப்பட்ட ஒரு பொது நிரலாக்க மென்பொருள் ஆகும்.
5

எழுதியவர்: ​சிந்துஜா,
கணினி ஆசிரியர் மற்றும் கட்டற்ற மென்பொருள் (Free Software Activist) ஆர்வலர்,
கேந்திரிய வித்யாலயா,
புதுச்சேரி.
Share:

சில குறிப்பிட்ட SOFTWAREரை பிறர் பயன்படுத்தாமல் செய்ய


கணிணியில் ஒன்றுக்கு மேற்பட்டவர்கள் பயன்படுத்தும் போது சில பாதுகாப்பு குறைபாடுகள் வரலாம். நீங்கள் நிறுவியுள்ள மென்பொருளை வேறு யாரும் பயன்படுத்தி விடக்கூடாது என்று நினைக்கலாம்.


சிலர் உங்கள் மென்பொருளில் நுழைந்து எதாவது மாற்றம் செய்துவிடலாம். ஊருக்கு போய்ட்டு வந்தோம். அய்யோ கணினியில் ஏதோ ஆகிவிட்டது என்று புலம்புவர்.

அலுவலகத்தில் வேலை செய்யும் போதும், கல்லூரிகளில், பள்ளிகளில் போன்ற பொது இடங்களில் பணிபுரியும் சூழ்நிலையில் இந்த மாதிரி கட்டுப்படுத்தும் செயல் அவசியமானது. இதனை நீங்கள்Group Policy Editor மூலமாகவும் செய்யலாம்.
ஆனால் எளிமையாக கையாள இலவச மென்பொருள் Appadmin உள்ளது. முக்கியமான மென்பொருள்களை எவரும் பயன்படுத்த முடியாதபடி இந்த மென்பொருள் மூலம் எளிமையாக செய்யலாம். இது மென்பொருள்களுக்கு கடவுச்சொல் கொடுத்து (password protect) அதை முடக்குகிறது. இதன் கடவுச்சொல் தெரிந்தவர்கள் மட்டுமே இதை பயன்படுத்தமுடியும்.
இதில் முதலில் உங்களுக்கான கடவுச்சொல்லை கொடுத்துவிட வேண்டும். பின் Block என்பதை கிளிக் செய்தால் எந்த
மென்பொருளை தடை செய்கிறிர்களோ அதனை தேர்வு செய்துவிட வேண்டும். மேலும் இன்னொரு வசதியாக எந்த மென்பொருளையும் இதன் விண்டோவில் இழுத்து விட்டால் (Drag and drop) கூட போதும். இதன் வடிவமைப்பு பயன்படுத்த எளிமையாக உள்ளது. இதை நிறுவத்தேவையில்லை.(No installation) அப்படியே தரவிறக்கி பயன்படுத்தலாம்.

Share:
Mohamed Sithick R. Powered by Blogger.

Search This Blog

Translate

Total Pageviews

Popular Posts

Contact Form

Name

Email *

Message *

Followers

SanDisk 16GB 2.0 Flash Cruzer Glide USB Drive (SDCZ60-016G-B35)

Maeffort Smart Watch, Outdoor Fitness Sport Smart Wrist Watch Bluetooth Waterproof

News

Food

Sports

Technology

Technology

Featured

Translate

[recent]

Blog Archive

Recent Posts

Pages